 I think I’ve briefly mentioned my cooking club to you all before.
Every Monday morning (well, probably a little closer to afternoon than morning), I meet with some friends (usually 4 or 5 of us total) for cooking club. We all pick a house, a time (then, mentally set the time back a 1/2 hour or more), and a recipe that serves 4.
We all share our chosen recipe through email, usually Sunday night–sometimes Monday morning, then tell each person whether we want their meal or not.
I tally up my partakers, and set out shopping for my recipes ingredients multiplied by however many people want my meal.
For instance, if 3 people responded yes to my recipe–I shop for 4 times that recipe (myself, plus the 3 others).
I keep my receipt, of course, then divide my total cost by 4 (or however many people I shopped for)–and that’s how much each person owes me! It ends up coming out to $7-$12 per meal–although this week, I got a fantastic $2 meal!
With this system–I don’t really have to go grocery shopping ever, I don’t have to make dinner, we have TONS of food (plus leftovers!), and it only costs around $40 a week (for 4 meals–l usually only end up getting 1 or 2 meals since there are only 2 of us–which brings it to under $20 a week for us!)
Get it?
We meet at the designated house on Monday morning afternoon, at the designated time (that’s been mentally pushed back at least a half hour by all), and we all cook our designated chosen recipes.
We all bring containers (which I usually forget, oops!) for the meals we’ve ordered from everyone, for easy transport back home.
It’s genius, really.
That way, if I’ve chosen to get everyones recipe, I end up with 4-5 meals and I don’t have to cook for the rest of the week! It’s sort of like a I have my own personal chefs.
Insert Advertisement: Need a personal chef? I am know a recent graduate who is looking for clients!

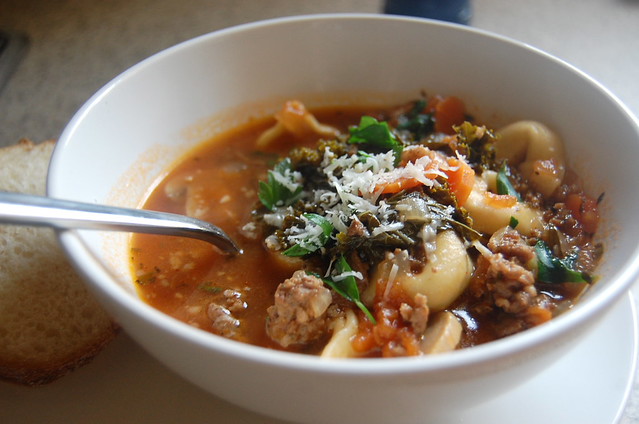
Sausage Tortellini Soup
This recipe was made at cooking club, so these are the only steps I had to take at home in preparing the meal = Excuse for lack of pictures.

I told you I’d show you a picture of my pretty blue pot with its pretty blue lid.

See? Pretty.


Wow! I’m astonished!
I won the NoshGirl Chef Challenge!
Can you believe it?!
Thanks everyone for your all your votes… You guys pulled through!
And thanks to Serena at Big Apple Nosh for hosting the challenge–It was a lot of fun!
I’ll share my prize with you all once it comes!
Woot Woot!
Just a reminder! Voting is open at Big Apple Nosh for the NoshGirl Chef Challenge! Be sure to vote for this recipe on that blog here!
Just leave a comment in the comments section (again, here).
Thanks!!!
____________________________________________________________
Let me pause for a moment so we can all drool over this:

Droooooooooooool.
It seriously tastes as good as it looks.
Just ask Paul, he literally applauded while eating.
I made this dish for a challenge I entered on a blog I enjoy reading… It’s called the NoshGirl Chef Challenge. Serena, over at Big Apple Nosh chooses 3 different bloggers, gives them 2 ingredients to cook with, then everyone votes and chooses 1 winner. (Like my counting there? 3,2,1.)
(Yeah, so I’m gonna need you guys to vote for me starting on Monday!)
Sounds fun, right?
Heck yea!
It’s like a bloggers take on Chopped.
The ingredients for this challenge?
Avocado & Cornmeal
After several days on writing down any ideas that popped into my mind of uses for cornmeal and avocado (yes, I dreamt about it too), I finally decided (with the Boo’s input) to make those bad boys up there.
Cornmeal-Crusted Fish Tacos with Avocado Tartar Sauce
The items you will need for 4 servings:
2 firm white fish fillets
1 avocado
2 cups cornmeal
1 lime
cumin
salt & pepper
paprika
chili powder
chipotle chili puree
taco sized flour tortillas
1 egg
tartar sauce
For garnish:
grilled corn, cut off the cob (we grilled out last night, so I snatched a leftover cob)
shredded red cabbage
shredded cheese (I used chipotle white cheddar)
sour cream
cilantro
lime
Phew–that’s a long list.
This is how it’s done:
This is the fish I used…

I would have preferred to use mahi-mahi, but I couldn’t find any. You can really use any kind of firm white fish you prefer.
If it’s frozen–thaw it by putting it (in a sealed bag) in a bowl of cold water. It only takes about 20 minutes to thaw.
There, thawed.

Once thawed, cut it into strips and throw it into a medium sized bowl.
To the bowl, add the juice of one lime, 1 tablespoon of cumin, 1 teaspoon of salt, and 1 tablespoon of fresh, chopped cilantro.

Let me say, it’s really nice to be able to walk out my back door and get my cilantro from this:

Isn’t she getting so big!?
Anywhooo…
Give the fish a stir, fulling coating it in all the goodness..

Then set it aside.
While that’s soaking up the goodness, grab a big plate and put the cornmeal on it.

To the cornmeal, add some salt (about 1 tablespoon), and some pepper..

Then add about 1 tablespoon of cumin, 1 teaspoon of paprika, and 1/2 teaspoon of chili powder

Oooh, like a volcano.
Mix it all together with your fingers

Then, in a bowl, crack one egg and add a splash of milk to it. (no milk? water will do!)

Whisk it up with a fork.
Now we’re ready to go! Woot woot!
Let’s preheat the oven to 375˚ F.
To crust your fish, take a piece and roll it in the cornmeal

Then the egg wash…

Then back to the cornmeal.
Lay it on a baking sheet line with foil.
Repeat this until they are all coated. Make sure they aren’t touching on the baking sheet–you want them to get nice and crunchy all the way around.


Stick them in the fridge for 10 minutes, then bake them in the preheated oven for 10 minutes, or until the crust is crunchy and the fish is flaky.
Next, prepare the avocado tartar sauce.
Cut an avocado in half.

Remove the pit.

Scoop out one half of the avocado into a small bowl.
Mash it up and mix it around.

Add 1/4 cup prepared tartar sauce (or just mayonaise will suffice).
Then add the juice of one lime.
1 teaspoon of salt.
A couple dashes of cumin.
And a spoonful of chipotle pepper puree (I had a can of chipotle peppers, I used the juice from inside the can.)

We like it hot around here, so I added 2 more spoonfuls of the chipotle (we still felt it could have used a little more heat.)
I’m getting so excited now, we’re getting close to the end!!
By this time, your fish should be done and it’s time to start assembling!
Spread a little bit of sour cream onto the middle of a tortilla, then layer with some shredded red cabbage, the cornmeal-crusted fish, grilled corn (off the cob), some shredded cheese, diced avocado, some chopped cilantro, and lime juice. Serve with the avocado tartar sauce.

You’re in for a treat!!
A beautiful, refreshing meal. The fish is nice a crunchy, the tartar sauce tangy and spicy–a nice balanced mouthful.
This stuff is for real.


I’m backkkkk!
Well, I actually got back on Monday night–but things have been quite hectic since then. As it turns out, our power was out the entire week we were on vacation. No good. Very no good.
It was really really no good on Tuesday morning when I threw entirely everything away from my rotting, stinky refrigerator.
Next weeks grocery bill is going to break the budget, that’s for sure.
But alas, vacation was splendid–it was nice to see everyone that we only get to see every half a year or so (the Hubs & I are both from Michigan so most of our family and friends are still there…)
My plants all survived the week–this year, unlike last year, I remembered to find them a sitter.
So, are you drooling from the preview of the recipe I’m about to share with you? I am. I actually made it a few weeks ago–and the thought of it still has me weak at the knees.
Portobello Ravioli with Smoky Sun-dried Tomato Sauce

salt, pepper, garlic powder, and oregano
1 cup grated parmesan


With the pasta dough (recipe here), I left you with your dough rolled into a ball, resting.

Uncover your dough, and start rolling it out. If it’s sticky, dust the countertop with flour (it’s okay to use a lot). Cut the dough into 4 sections–this will make rolling much, much easier.

At this point, I started to use my pasta machine to roll the rest of the dough. If you don’t have one of those–just keep rolling! You want your dough to be relatively thin–about the thickness of a quarter.

Keep rolling, rolling, rolling…Keep that pasta rolling…Rolling, rolling, rolling…Roll outtttt.
When your dough is ready–lay it out in a sheet on the counter. Spoon tablespoon sized scoops of the filling onto the dough in a grid-like pattern.

With a finger, brush water or egg yolk in the seams.
Place an equal sized sheet of dough on top of your filling-mounds.

Carefully, start pressing the two layers of dough together around the mounds…

With a pizza cutter (or a knife), cut the ravioli into squares.
Seal each individual ravioli–pressing out all the air pockets.


Tada!
To cook these–heat a large pot of water. Bring it to a rapid boil and throw in a large handful of salt. I cannot stress two points enough: LARGE pot. LARGE handful of salt.
You need the large pot so the raviolis have room to swim around and not stick to each other.
You need a lot of salt in the water to season the pasta. The water should taste like saltwater. This really makes a difference, I promise.
These will only need to cook for about 3-4 minutes.
For the sauce:
Git yer gouda…

And shred it. All of it.

I want to tell you a secret about this gouda.

I was shopping for my gouda–looking in the fancy cheese section of my grocery store. There they had an 8 ounce block of Boar’s Head Smoked Gouda for $8.99. $8.99! For a half a pound!
Then I thought about something…
I thought, “Hmm…We used to get Boars Head Smoked Gouda at work–and it came in a big block that you have to slice like a deli does…I wonder if the deli here has it too?!”
So, I wandered over to the deli counter–and lo and behold, they had a big ole block of smoked gouda. And guess what?! It was $8.99 for an entire pound! That’s half the price!
I asked the kind, deli-sir to put the slicer as thick as it would go and slice me a nice chunk of the cheese. He rang it in–and it was on sale!
So here it is, I got .62 pounds of this cheese for $4.95, instead of .5 pounds of the same cheese, just individually wrapped, for $8.99–in the same grocery store.
I should be an extreme couponer. Except without the coupons. Just the brains.
I also grated about 1 cup of parmesan cheese.

Then I chopped up some sun-dried tomatoes to have them ready.
Next, I heated my sauce pan and melted my butter.
Once the butter was melted, I added the flour.

Stir the butter and flour around until it forms a clump.
Yes, a clump. That’s the best word I can think of to describe it.

Once in clump state, slowly start adding the milk.
I added about 1/2 cup at a time.

Make sure the milk is entirely mixed in before adding more.
This will prevent lumps.
It’s a slow process, but it will be soooo worth it when you sauce is velvety and smooth–not lumpy and floury.

You should end up with a thick, smooth cream that tastes really gross.
So lets make it taste better!
Add in the grated cheeses–save a little of the parmesan for sprinkling later

Also, add in the dice sun-dried tomatoes.
Stir in some salt and pepper, as well as garlic powder, until it tastes how you like it.
This sauce is absolutely delicious.
Drool…..
Cook your raviolis–then just dump gobs and gobs of sauce on top.
This will be the best ravioli you’ve ever had.
No, seriously. It will be.
Like, I licked my plate. I really did.

Yum.
I apologize for my lack of posts as of late.
The Boo and I took an impromptu trip to Michigan this week. We’re still here, but we’ll be home soon. (I’m not posting dates because I’ve recently become one of those people that’s a freak about not telling anyone how long we’ll be away, we could pop at home ANYTIME–so don’t even try to break in. 🙂 )
But, I promise, we will return home soon and I will continue my regular posting.
And when I do…


Happpppy Monday!
Hope y’all had a GREAT Easter weekend! I did.
I made the Boo and I a little Easter dinner just for the two of us. In between the 5 services he had to do at church yesterday, we had a couple hours to enjoy dinner.
Of course, I forgot to take pictures of everything.
Whoopies!
I managed to snap a few pictures from my iPhone–so that’s what you get.
I don’t think this recipe will be too useful to you now that Easter’s done–but hey, there’s always next year, right? And who knows, maybe you’ll make deviled eggs a weekly staple for you?
No?
Deviled Eggs
What you need:
6 hard boiled eggs
1 green onion
1/3 cup mayonaise
1 tablespoon of dijon mustard (regular mustard will suffice if you don’t have dijon)
2 dashes on hot sauce
1 teaspoon of white wine vinegar
salt & pepper, to taste
paprika, for sprinkling
It starts with hard boiled eggs. Here it is, the secret recipe. It’s tricky, are you ready?
1. Put 6 eggs in a saucepan.
2. Cover the eggs with cold water–1 inch higher than the top of the eggs.
3. Put 1 tablespoon of vinegar in the water. (This keeps an egg from spreading if it breaks open. It helps it coagulate.)
4. Bring the eggs to a boil.
5. Let them boil for 1 minute.
6. Remove from heat and cover.
7. Let sit in water for 14 minutes.
8. Move eggs to a bowl of ice water–this will stop the cooking.
Tada! Perfect hard boiled eggs.
Okay. So, after the eggs have cooled, cut them in half lengthwise. Remove the yolks into a bowl, and put the eggs on a plate.

To the yolks, add the rest of the ingredients besides the paprika.


Not bad pics for a phone, eh?
Speaking of my iPhone. I got it 4 days ago. Immediately I ordered a phone cover off the internet.
The next day, I got insurance on it from Best Buy. (It’s pretty sweet insurance, it’s only $15 a month and you can break your phone as many times as you want and they just send it in and in like 3 days you get a new one. FANTASTIC, right? )
I’ve been doing realllllly well, trying to protect my phone.
Today–I dropped it. On the cement.
It shattered.

3 hours later, I got my case that I had ordered in the mail. Convenient.
ARG!
Well, tonight I went to the mall to send it into the Best Buy to get it fixed, and I decided to stop by The Apple Store quick, to see if there’s anything they could do. (They did replace Paul’s iPad (FOR FREE) when he left it on top of his car, and it fell into the middle of one of the busiest streets in town and got ran over several times before Paul went searching for it several hours later)
Welp, Apple is good. They fixed my phone. For free. No sending it in. No waiting. Fixed phone. No cracks. Free.
Yay Apple. Recommended, for sure.
(Nope, they didn’t even pay me to say this to you.)
This is completely un-food related–but I just gotta share it.
A lot of you have probably never heard of this band, but I just can’t keep them to myself–they are SOO good.
They are an indie folk duo (John Paul White & Joy Williams)
They are absolutely Fan. Tas. Tic.
They have AMAZING harmonies.
I’ve been listening to them for quite a while now, and all of a sudden they just blew up–they’re getting rave reviews by everyone.
You should download their album, Barton Hallow–it’s only $7 on iTunes. It’s worth the $7.
@thecivilwars john, being a brother here…. Looked like your fly was down when introducing the opening act… Louisville!
He was grateful. they loved it, and they dedicated a song to him:
Fantastic!
We even got a picture with them afterwards…Woohoo!

Doesn’t he look like Johnny Depp?
Anyways, they are absolutely fantastic and I strongly encourage you to check them out.
Basic Pasta Dough
Printable Version
Recipe by Tyler Florence
You’ll need:
2 cups all purpose flour
3 eggs
1 teaspoon of salt
2 tablespoons of extra virgin olive oil
Cornmeal, for dusting
Get your mise en place all ready.

Mise en place means ‘everything in its place’, meaning measure all your ingredients and have them handy before you start cooking. The first step to mise en place is always to read the entire recipe from start to finish, so you know what to expect.
Dump the flour onto a clean working surface, mix in the salt

Make it into a pretty little mound, then create a little well in the center

Beat the eggs (Oops, I forgot to!) and

Add the olive oil as well…

Start to lightly beat the eggs, gradually draw flour into the mixture while beating.

Slowly, but surely, draw more and more flour into the mixture until a firm dough starts to form.
Then, start kneading the dough.

If the dough is too dry and hard to knead, add a little hot water.
Knead until elastic-ey, form into a ball. Dust the tabletop with cornmeal as needed to prevent sticking.
If you’re using an electric mixer...It’s even easier!
Put the flower (oops) flour in a mixer fitted with the dough hook attachment…

Add the eggs and mix on low.

Slowly drizzle in the olive oil…

Mix until it comes together as a dough, then dump out onto a floured/cornmealed surface.
Knead until the dough is smooth and elastic-ey.
 |
| This is what a picture looks like with horrible lighting. |
Roll the dough into a ball.

Orrr…

A butt! Bahahaha.
Then cover it with plastic and let it rest for 20 minutes.
Ta da! Pasta dough.
To use the dough, simple roll it out into a thin sheet & cut it into whichever shape you’d like.
To cook homemade pasta–it takes MUCH less time. Cook in boiling, heavily-salted water for 3-4 minutes until al dente. Serve with your favorite pasta sauce, pesto, or simply butter & parmesan cheese.
Bon Appetit!

Today, this 17th day in April, 2011, is Gracie Mae’s 3rd Birthday; therefore, this entire post is devoted to her.
Little Miss Mae is celebrating her third year of life. I still remember her first day with us.
Look how much she has grown! Wasn’t she just a darling little peanut!?

For her birthday, we typically go for a nice long walk, or to the park, and then we go to the pet store and let her pick out a couple new toys of her choice…And, yes, she really does chose them.
We always have a little photo shoot, to document her growth, and her day. And this year, we added something new into the mix–I made her yummy homemade doggie treats (and yes, Paul & I both tried them.)

Homemade Pooch Treats

In a mixing bowl, combine 1 cup of rolled oats..

…and 1/3 cup softened butter.

Then pour in 1 cup of hot water (just like you’re making oatmeal!)

Mix it together a bit, and let that sit for 10 minutes.
Measure 1/4 a cup of cornmeal,

and grate 2 carrots.

Put the carrot shreds into a piece of paper towel and gently squeeze the juice out.
Next, chop up 1/2 cup of parsley…

..and measure 1 cup of peanut butter.

Add this all to the bowl with the oatmeal.

Next, add 3 cups of flour.

I would have used whole wheat flour if I’d had it–but I didn’t…So, I just used plain ol’ all-purpose flour. If you have whole wheat flour, I recommend using it.

Add 1 egg and 1/4 cup of milk, then mix it all together.
It should look something like this.

You may be tempted to eat the dough at this point–it smells like peanut butter cookies. Don’t let yourself be fooled–this is going to be dog food. Remember? But mmm, it smells so good.
Mmm, smell them?

Dump the dough out onto a well-floured surface. The dough should be firm, not too sticky. If it’s sticky, dust it with flour and knead it a bit until it becomes firm.
Form it into a ball.

I rolled the dough a bit and found it was too much, so I cut it in half.

Roll your dough to about 1/4″ thickness.

Use a cookie cutter to cut it into whichever shape you desire.


Lay the cookies on a grease cookie sheet. Bake on 350˚F for 45 minutes–until hardened.
Let them cool, and share them with your favorite pooch!


Here it is, the big reveal!
After several weeks of eagerly waiting, anticipating, and stressing, the day has arrived that I can finally share this HUGE news with you all.
I am pleased to announce the growth in our house!
New life is blossoming here in this family, and I couldn’t be more excited to finally share in this with you.
I am thrilled to be able to celebrate this joyous day with everyone!
That’s right!
My herbs are finally in bloom!

On Monday, it rained and rained and rained, ALLLLLLLLLLLLL the live long day. And I, being the horrible gardener that I am, left all my pots out on the steps while I was away all day. My face paled and my stomach dropped to my toes when I was at cooking club and remembered that my pots we’re still sitting outside on the porch.
They were doomed, I knew it. All that water. All the flood warnings…they were done for.
Apparently, all that rain was what they needed because the next day, this happened:


It’s clearly doing the best of all the herbs. It’s even starting to take its shape.

I picked a piece and ate it, and it’s delicious. Mucho cilantro-ey. I cannot WAITTTT to use it this summer! It will be so nice to not have to run to the store all the time for herbs.
The parsley made it’s appearance next.

It’s not quite as full and robust as the cilantro–but I’ll take it. It will come, in time, in time. It also hasn’t started to take it’s signature flat leaf parsley shape. It will get there, I know it will.
Next, my marigolds started to sprout.

I’m a little underwhelmed with the state of these. They haven’t done much growing since they first sprouted, and come on, where are all the brothers and sisters? They are going to need to start appearing if I am going to have the beautiful welcome plant on my front stoop like I had hoped…
Then finely, the lone basils started appearing. I almost missed them–two tiny little sprouts on the very side of the pot. Last year, the basil were the quickest growers.

They’re shy this year, they must be.
Maybe that’s why I can’t seem to find basil at any grocery stores this year…They’re shy.
Anywhoo…
Precious herbs.
I can’t wait to see how they grow up.
